 Today I’ve got something really important to share…
A Complete Guide To Making Your Own Arrows From Scratch
Because the art of making your own arrows is a survival skill worth learning.
Why? Because it’s a major form of self-reliance.
And as survivalists, we love self-reliance.
Imagine pairing the power of learning both:
- How To Make Your Own Arrows AND
- How To Make A Longbow.
You’d never be an unarmed and helpless sap again.
No matter how bad our world becomes.
TOPICS IN THIS GUIDE… ↓(click to jump)
- Basic Parts of An Arrow
- How To Make Your Own Arrows
- How To Make Your Own Shafts
- How To Make Your Own Fletchings
Want a free 54 item survival gear checklist?
Click here to instantly download this Complete Checklist PDF. No purchase necessary.![]()
Basic Parts of An Arrow
The Arrowhead
At the leading tip of an arrow is the “arrowhead.”
This is the deadly sharp tip that does the real damage.
It can be skinny, broad, and normally made out of stone or metal.
But the good ones are razor-sharp and can penetrate deep into your intended target.
The Shaft
The next part is the “shaft.”
As the name implies, the long skinny part that attaches the head and the fletching.
You can think of the shaft as similar to the chassis of a car.
It’s not sexy, but it holds everything together.
This leads us to part 3.
The Fletching
The fletching is the thin blades of feathers or plastic that are essential for controlling the arrow’s flight trajectory.
Without fletching on the back of the shaft, your arrow will fly erratically and out of control.
Hitting a target without fletching is a much more difficult task.
The Nock
Lastly is the nock.
The nock is a small “notch” at the base where the bowstring and the arrow meet.
A proper notch is essential for the bowstring to fire accurately.
Without a notch, the bowstring release would not completely transfer to the arrow.
The bottom line is:
The notch is critical for performance.
Want a free 78 item prepper checklist?
Click here to instantly download this Complete Checklist PDF. No purchase necessary.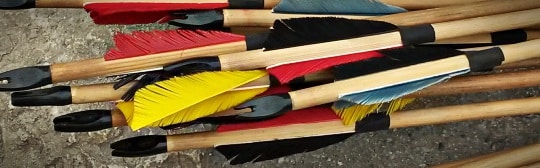
How To Make Your Own Arrows
The process can be broken down into making the component parts and then assembling those parts.
So I will start with arrowheads, end with the nock, and then wrap up with how to assemble the entire thing.
↓ Building Wood ARROWS – Start to Finish
How To Make Your Own Arrowheads
Getting the arrowhead right is essential.
You can make your own arrowheads out of many raw products.
Stone, rebar, porcelain, or even glass.
As long as the arrowhead has balance and is sharp as hell.
Here are the basic steps:
- Using a hammer or stone, break pieces of Flint, Slate, Obsidian, or Chert into roughly triangular pieces – no longer than 2 inches and no wider than 1 inch.
- Trimming and shaping the arrowheads is accomplished through a process called “Flint Knapping.” To do this, strike lightly against the edges with a nail or screwdriver to produce jagged, sharper edges. This produces strong edges.
- The next part is aptly called “Grinding” because you use a stone or sandpaper to grind away the edge until it is razor-sharp. This weakens the edges that will wear down with use, but the edges are not as important as the point. So I wouldn’t worry too much.
- Finally, chip away a couple of indents at the bottom of the arrowhead for fastening to the shaft. This can be achieved using the bolt or screw to sand away the stone to create perfect little half-circle indents.
If an image is worth 1000 words, a video is better.
So let’s walk through a few excellent how-to videos.
↓ How to make an obsidian arrowhead for primitive archery
↓ How to Make a Forged Steel Bodkin Arrowhead From Rebar
↓ Making an arrowhead out of Toilet Porcelain
Now you may be wondering, “are these handmade arrowheads as good as expensive store-bought broadheads?”
Well, then, you should check out this test video:
↓ Part 1: Glass Arrowhead vs. Modern Broadhead – Gel Penetration Test
It looks like the handmade glass arrowhead held its own.
But you must be patient and practice your arrowhead-making skills to get similar results.
If you are unwilling to invest the time and energy, buy some good broadheads online and attach them to your shafts.
Want a free 78 item prepper checklist?
Click here to instantly download this Complete Checklist PDF. No purchase necessary.How To Make Your Own Shafts
Shafts are typically made of wood or lightweight plastics.
Because these are materials you can machine and mold but are still strong enough for our purposes.
The key to making good shaft is balance and symmetry.
When you’re done, you want it to be perfectly round.
The good news is:
The DIY arrow shaft process is the same regardless of the material chosen.
Selecting Your Shaft Material
With wood, you want to find a slab with very few imperfections.
So a limited number of knots or warping.
Now take your raw slab of lumber and cut it into as many square pieces as possible.
Cut them to your desired overall length.
Here’s a video on selecting shaft wood and initial cuts:
↓ Arrow shafts from lumber
Shaft Making Jigs
Once you have your square cut shafts, you must round them into dowels (arrow shafts).
You can do this via several different methods (see the following videos), but the basic process is the same.
First, feed the square shafts through a router, saw blade, chisel, or sharpener while rotating the square shaft.
You create the rotating motion with a drill.
This rotating and feeding process creates your perfectly round shafts.
Here are 4 videos detailing several unique shaft-making jigs.
↓ Simple Dowel Making Jig For The Table Saw
↓ Making Arrow Shafts With The Veritas Dowel Maker
↓ Old School Dowel Making Jig
↓ How To Make Your Own Shafts With A Shooting Board
Fine Tuning Your Shafts
Now use your drill to rotate the shaft in a piece of sandpaper quickly.
This helps to smooth the shaft and fine-tune its symmetry.
You can try sighting down the shaft to verify it’s perfectly straight.
But there’s a much easier way to verify this…

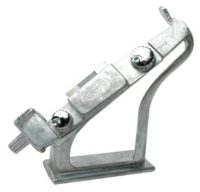
![]() Use an spinner to test your shaft.
Use an spinner to test your shaft.
An arrow spinner will give you visual feedback on how straight and balanced your shaft is.
Keep sanding and testing until it spins smoothly on your spinner.
You can either purchase a good spinner or make your own (see the video below).
↓ DIY Arrow Spinner: How To Make Your Own
Fletching Your Arrows
It’s important to get your fletchings right.
They are essential to keep your arrow flying perfectly straight.
Before you can add fletchings, you must choose your fletching material.
Traditionally, bird feathers have been used as fletchings.
But feathers are not the only material available.
You can also use duct tape.
↓ Make Duct Tape Fletchings
Regardless of the material you choose…
 The best way to apply a fletching in the proper location and orientation is to use a fletching jig.
This device will help you get the critical fletching application right.
Here’s how to use a fletching jig.
What about those of us who are hardcore DIYers? Then make your own fletching jig.
↓ How To Make A Homemade Fletching Jig
Adding The Nock
The nock is simply a slit at the end of the shaft, right?
Well, technically, yes, but there’s more to it than that.
For example:
Watch the next video to see how to properly add a nock at the end of your shafts using hand tools.
↓ Self-Cut Nocks In Wood Shaft
You also might want to add some horn inserts for your self-nocked arrows.
This strengthens your nock and prevents the ends from splitting after heavy use.
Remember:
This is where your bowstring and arrow touch.
So it’s the location on the arrow shaft that will take the most force during the energy transfer.
Want a free 78 item prepper checklist?
Click here to instantly download this Complete Checklist PDF. No purchase necessary.↓ Horn Insets for Self-Nocked Arrows
Finally, you may want to purchase nocks online.
And then fit them over your wooden shafts.
It’s faster and easier; you’ll need to taper the end of the shaft to allow the nocks to fit onto the shaft.
↓ How to use the Deluxe metal Taper Tool
Putting It All Together
So now you have all the basic steps to making your own arrows.
But now you must put it all together.
Here’s a series of videos that show you one way from start to finish.
↓ Part 1. How To Make Your Own
↓ Part 2. How To Make Your Own
↓ Part 3. How To Make Your Own
Final Thoughts
You now have all the knowledge to start making your own arrows.
However, if this is all new to you, then you don’t yet have all the skills.
It’s a labor intensive process that takes time and gumption.
And the only way to acquire those is to take meaningful action.
To find some raw wood, cut it into square sections, feed it through a shaft jig, make an arrowhead, add fletchings and nocks, and try it.
Why Trust Skilled Survival...
Go here now to review a full breakdown of:
- Who We Are
- Our Credentials
- Our Mission
- & Product Recommendations...
Here are a few highlights of our teams credentials & certifications:
- Certified Member of a Mountain Search & Rescue Organization
- Plant Emergency & Safety Leader for a Major Food Manufacturer
- Member of the 10TH Mountain Division Hut Association
- Certifications: Avalanche 1, WFR, CPR
- Official Gear Tester for Numerous Outdoor Gear Companies
- Countless Multiday Backpacking trips into Remote Wilderness
- Bachelor's Degree In Mechanical Engineering
- Bachelor's Degree In Civil Engineering
- Bachelor's Degree In Biomedical Engineering
"It takes 20 years to build a reputation and five minutes to ruin it." - Warren Buffett
We're fully aware that trust is NOT something you GET but is EARNED.
And we'll continue to earn YOUR trust through our forthright and honest approach with each new Blog Post, Guide & Product we create...
Will Brendza

P.s. Do You Live In A 'Danger Zone' County?

Find out now using my Danger Zone County List & Special Report it’s absolutely FREE.
In minutes you’ll know EXACTLY where you stand and if you should be worried or not..
So click here to get my FREE Danger Zone County List & Report…
Top Image Source
Recommended Reading
Survival Pack: How To Build One NOW (before SHTF)
Survival pack list From Scratch. Packs That Will Make You A Hero To Your Family. Plus, Some Of Th Best Packs You Can Buy
Best Survival Packing List To Plan For An Evacuation
Everyone needs a survival packing list to organize their escape. That way you won't regret leaving something critical behind.
13 Best Wild Edibles ANYONE Can Find Nearly Everywhere…
Discover the best wild edible plants you can find and eat nearly anywere. Knowing and identifying these wild edibles could save your life.
How To Make Catfish Bait: My Grandpa’s Ultimate Recipe
I want to share with you what I consider the best catfish bait recipe. Here's how to make stink bait that will get the catfish to bite.
Paracord Projects: 17 Survival Devices You Can Make
I share the best paracord projects that are both fun and useful. By doing these crafts you'll always have lifesaving cordage on hand.
Best Survival Skills Every Adventurer Should Learn
The best survival skills will keep you alive even in extreme conditions. 1. Water 2. Shelters 3. Fire 4. Navigation 5. Signaling 6. Medical 7. Foraging...