 A Complete Guide On Buying & Using A Suture Kit In An Emergency
Because your skin is the largest organ in your body, and it holds you together like a sack.
- It keeps your internal organs and fluids from spilling out.
- It protects your insides from external forces and regulates your body temperature.
But sometimes – often – in survival situations, your skin gets sliced wide open.
- Maybe you cut yourself with a can-opener or a knife
- Or perhaps you hit your head on a rock
- Or you caught a jagged branch in the chest, and now you’re laid open
THAT’s when you’ll be glad you have a suture kit and know how to use it!

Best Survival Suture Kits On The Market Today
Suture kits are one of those survival items you don’t really need until you really freaking need one.
It very well could sit unused in your backpack for months, even years. But one day, when your hand slips on a survival knife or gash your leg on a sharp rock, it could make the difference between life and death.
That being said, you want one you can depend on. That’s why we’ve identified some of the internet’s highest-rated, medical-grade suture kits:
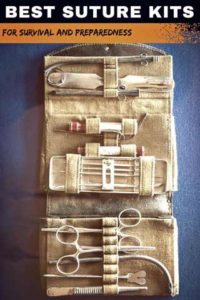
This suture stitching kit is the ideal surgical add-on for anyone who want to learn OR use their suture skills in a pinch.
This suture kit is the secret for both surgeons and clinical educators who understand real-life emergencies.
The kit includes:
- One 5" Needle holder
- One 5" Mosquito Forceps
- One 4.6" Iris Scissors
- One 4.7" Adson toothed forceps
- One 4.7" Adson toothless forceps
- Twelve disposable blades
- One 5" Scalpel knife handle
- One Large military-inspired carrying case
- 30 Mixed sutures
Everything you need to either practice or save a life in a real emergency.
Here's what others have said about this kit.
- "Exactly what any prepper needs for an extreme medical kit for when SHTF."
- "Awesome mixture of sutures, especially for those practicing different types of suturing."
- "Great kit with everything one would/could need for closing up wounds. I’ve already used it to close a self-infected chainsaw plunge cut to the palm."
It's a solid suture kit, you can use in a real emergency to close up a nasty gash at home.
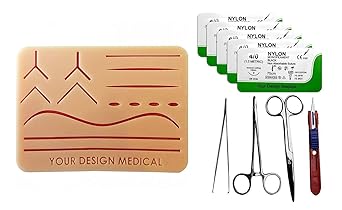
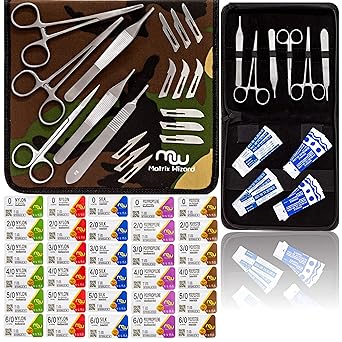
![]() With nylon sutures, a scalpel, forceps, scissors, and a suture driver, you're ready to start stitching.
With nylon sutures, a scalpel, forceps, scissors, and a suture driver, you're ready to start stitching.
This training kit also comes with a silicone flesh suture practice pad.
That way, you can hone your flesh sewing skills before taking them to the field.
If you are not quite ready to put your skills to the test in an emergency, you should pick up this practice kit.
This kit will allow you to learn how to suture in a safe way, with real tools, before using your new skills on a live human.
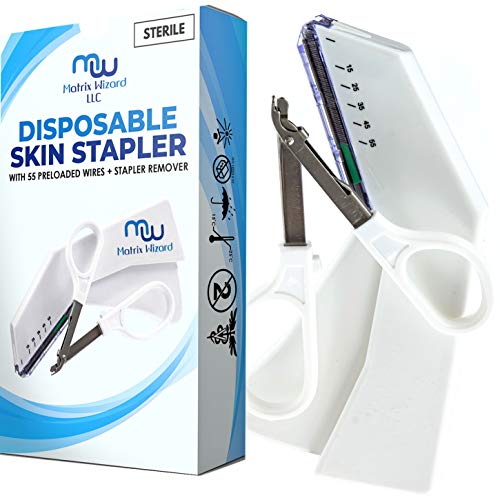
Maybe you want an "easier to use" suture option.
A way to close a wound fast without needing to be skilled with needle and thread.
Look no further than a suture stapler.
The MATRIX WIZARD disposable wound closure stapler and remover combo pack is medical grade, which is made from high-quality material.
The pack contains one sterile skin stapler, which is a great alternative for surgical sutures, and one stapler remover.
↓ Surgical Skin Stapler: Take A Close Look At How It Works ↓
What Is A Suture Kit?
If you’ve made it this far into the article and still don’t know what a suture kit is, I owe you an explanation.
In the medical world, a “laceration kit” is a set of tools and supplies used to close an open dermatological wound. That is to say; it’s a medical sewing kit for sewing up human skin.
Paramedics carry them. First responders carry them. Wilderness first responders, firefighters, and military personnel carry them. Even concert venue first aid staff carry suture kits.
They’re a staple for medical preparation and good for survival preparedness. But the process of suturing a wound closed is a serious mini-surgery. And it takes both extensive research and practice to suture successfully.
Do NOT buy one unless you plan on learning how to use it and are fully prepared to do so. Otherwise, it’s a useless piece of survival gear.
Attempting to close an open wound when you have no earthly idea what you’re doing can be a quick way to go from bad to worse.
Want a free 78 item preppers checklist?
Enter your email below to instantly download this Complete Checklist PDF. No purchase necessary. 👇 👇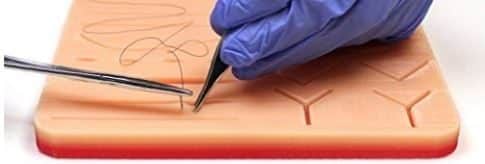
Why Suturing Wounds Is So Important
Stitching (or “suturing”) open wounds makes it possible for a laceration to heal faster and properly.
Often, if an open wound that requires stitches is left untreated, it will open up again.
Without stitches, accidental bumps, scrubs, or rubs will pop a weak scab back open. This prolongs the healing process and makes the wound more susceptible to infection. But by suturing the wound closed, you’re providing extra support to hold the skin together.
That way so it can heal at maximum speed and efficiency. This is particularly useful in the wild or in a survival situation where mobility is critical.
A sutured cut will stay closed and continue healing despite the less-than-ideal conditions. While moving with an open gash or wound is both painful and dangerous.
It can impair your ability to survive and deplete your limited but vital energy reserves.
You’ll quickly find yourself in a heap of trouble without a way to seal a severe laceration shut. That’s where a doctor or medical professional comes in handy. One of those 24-hour medical clinics where you can get immediate help.
The ones with local anesthetics and nice nurses who’ll stitch you up with a smile. But hospitals and health clinics are not resources we can always rely on. You won’t find such medical conveniences in the wild, on a battlefield, or in the apocalypse.
You’re going to have to rely on yourself, your survival knowledge, and your survival gear.
That’s why you should own a medical-grade survival suture kit.
One you can stash in your bug-out bag or with your survival equipment. It puts you on another level of preparedness. You should, of course, already have a basic first-aid survival kit.
And check out this guide to building a tactical medical kit if you want to build your own. But when you’ve got a nasty cut that needs stitches, you’re going to be glad you packed that extra kit.
Want a free 54 item survival gear checklist?
Enter your email below to instantly download this Complete Checklist PDF. No purchase necessary. 👇 👇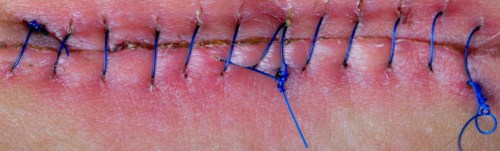
How To Suture (a very brief introduction)
There are loads of different suturing techniques for sewing shut skin.
It’s been a necessary medical skill for a very long time – roughly 30,000 years, in fact! So it’s nothing new.
Cavemen did it, after all, so it can’t be that difficult, right? Not exactly.
Suturing is medical science, and it takes some practice to master the skill. Hence, the practice pads are included in some of the suturing kits listed above.
Not just that, but there are a lot of needle types and threads for various lacerations. It even depends on what kind of cut you’re dealing with and how thick the skin in that area of the body is.
![]() A worthwhile medical textbook will help you choose which threads and needle sizes to use for different situations. But, no matter what type of needle or weight of the thread you are using, the basic technique is the same.
A worthwhile medical textbook will help you choose which threads and needle sizes to use for different situations. But, no matter what type of needle or weight of the thread you are using, the basic technique is the same.
Here is a brief overview of how to go about sewing someone up:
1. Assess The Injury
First of all, is this something you can handle? Really?
If not, it might be best to wait for a medical professional.
- Is the cut too massive for you to stitch up on your own? Seek medical attention.
- Is there too much blood exiting the wound, and you can’t work with it? Seek medical attention.
- Are there foreign objects in the wound you can’t remove? Seek medical attention.
- Is it a cut you feel confident you can deal with? Go for it.
Sometimes, though, you’re not going to have much choice in the matter.
In a worst-case scenario, where professional medical help is not an option, you may have to try or die…
2. Prepare Everything First
Make yourself (or your patient) as comfortable as possible. Sterilize all the materials with a sterilizing solution or hydrogen peroxide. Clean the wound with iodine and rinse it with saline solution.
Make sure your needle is affixed to your thread and a knot is tied at the end of it. Grasp the needle with the needle grabbers vertically (or hold them if you do not have them).
If you have one, apply a local anesthetic to mitigate the pain. If not, warn your patient this is about to hurt like hell.
You might have them bit down on a stick to prevent them from breaking their teeth.
3. Start Stitching
Start at the end of the cut closest to the patient’s face, and work away. Pierce the skin as close to the cut as possible. Try doing this without hemorrhaging or compromising the strength of the stitch.
Loop it down through the flesh, nearly as deep as the cut.
You may have to stabilize the skin with a tissue stabilizer to puncture the needle through both sides. When the tip of the needle is poking out, grasp it with forceps and gently pull it through the other side. You should try and cause as little trauma to the skin as possible.
To minimize entry wounds, the needle should always penetrate the skin at a 90-degree angle. And should also exit perpendicular to reduce exit wounds.
Both sides of the cut should end up looking like mirror images of each other.
4. Tie The Knot
Once you’ve run your suture through, fasten the loop in place with a knot.
This is called an “interrupted suture” when you tie off each individual loop. There are knot-tying devices doctors use, but in survival, you won’t have access to such equipment. In that case, the square knot is traditionally used.
Realistically, the knot itself doesn’t matter much as long as you can trust it won’t fall out or loosen up over time.
Stitch every loop through, individually tying each closed as you go along. Snugly tug on each one to make sure they are not too loose.
5. Disinfect Again, Bandage
To keep it clean, iodine and saline rinse your recently sealed cut. An infection is the most significant danger of suturing a wound shut, so do everything you can to prevent that. Once everything is sterile, bandage the injury with gauze and medical tape.
Replace the bandage and clean the wound once a day until it has healed and stops oozing.
6. Removing The Sutures
Once the wound is healed, you are going to have to take out the stitches you put in.
This is not a particularly complex, painful, or delicate procedure. But, you should be careful not to damage the freshly healed flesh.
Using sharp, disinfected scissors and tweezers, cut the individually stitched loops. Pull them gently through and out of the skin.
Wipe the wound down with alcohol when done. And that is it! You’ve been stitched, healed, and fixed, and now you’re good to go.
An excellent video shows you several more stitching methods you can practice.
↓ Learn How To Suture – Best Techniques & Training ↓
Improvising A Suture In A Pinch
Even if you own a suture kit, you might not have what you need in a survival situation, which means you may need to improvise. That’s okay because, in fact, there are some very effective makeshift options out there….
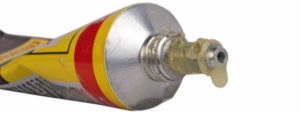
The Super Glue Suture
Medics in Vietnam widely used cyanoacrylate (a.k.a. “super glue”) to suture wounds shut. And it was highly effective in the field.
Sadly, the FDA never approved it for legitimate use in the states.
It was due to fears that the chemicals contained within them were unsafe to put in the body. So, the technique fell by the wayside. But superglue still works wonders when it comes to closing wounds. It’s necessary for any first aid, medical, and suture kit.
Super glue is an easy medical hack that can reasonably mimic full-on surgical stitches.
I recommend keeping it in mind throughout any survival or wilderness emergency.
↓ How To Super Glue A Laceration ↓
The Duct Tape Suture
Duct tape is far from ideal, but it works if you have an open wound and you need to shut it ASAP. And if all you have is a shiny roll of duct tape, use it.
It will work as a makeshift suture, but it’s not going to last very long. Be careful not to cut off circulation with it, though. It’s best to rip the tape into narrow strips and place them across the wound like steps on a ladder.
Then fortify those makeshift stitches with long strips that run the length of the wound. These should be laid on top of the shorter individual strips.
↓ Total Outdoorsman: How To Make A Duct Tape Butterfly Suture ↓
The Final Word
Suture kits come in handy in the most dangerous and most dire survival situations. However, they will not serve you unless you really need them, but when you really freaking need them, they will serve you well.
Without a proper kit and the knowledge of how to stitch a wound, you may find yourself up a creek without a paddle.
Bleeding out and wishing you had bought and packed a suture kit in your trauma bag. Don’t let that happen! Prepare yourself today, and thank yourself tomorrow.

Prepare, Adapt & Overcome,

P.s. - I just found out 2 out of 3 Americans don’t feel prepared for a 3 day disaster!!!

I guess this goes to show how modern society continues to embrace ‘living a fragile life.’ What’s crazy is… it’s so easy to fix.
To make sure YOU have the basics, watch our FREE training on “10 Simple Steps To Basic Preparedness” that shows you HOW.
Nothing crazy here… this isn’t doomsday prepping... just the basics every responsible adult should have before a disaster strikes.Why You Can Trust Skilled Survival...
Go here now to review a full breakdown of:
- Who We Are
- Our Credentials
- Our Mission
- & Product Recommendations...
Here are a few highlights of our teams credentials & certifications:
- Certified Member of a Mountain Search & Rescue Organization
- Plant Emergency & Safety Leader for a Major Food Manufacturer
- Member of the 10TH Mountain Division Hut Association
- Certifications: Avalanche 1, WFR, CPR
- Official Gear Tester for Numerous Outdoor Gear Companies
- Countless Multiday Backpacking trips into Remote Wilderness
- Bachelor's Degree In Mechanical Engineering
- Bachelor's Degree In Civil Engineering
- Bachelor's Degree In Biomedical Engineering
"It takes 20 years to build a reputation and five minutes to ruin it." - Warren Buffett
We're fully aware that trust is NOT something you GET but is EARNED.
And we'll continue to earn YOUR trust through our forthright and honest approach with each new Blog Post, Guide & Product we create...
P.s - I just took this FREE 60-second 'Readiness Score Quiz'👇
AND... I've still got a few gaps in my preps...🤔 But at least, I'm not part of 'The Fragile Masses'. 👍 Find out where YOU stand by answering a few questions...
Recommended Reading
LifeStraw Review: An Expert Puts It To The Ultimate Test
LifeStraw Review - with no moving parts, chemical additions, or batteries, it provides a lightweight, compact filter to treat up to 4000L...
Best Survival Bow: 16 Surprising Reasons YOU Should Get One
A survival bow is one of the most underappreciated weapons I think EVERYONE should own. Here are 16 reasons why YOU should get one today.
Best Survival Hatchets: Tough Enough To Outlast The Wild
Not all hatchets are created equal. A quality survival hatchet can do tasks even a survival knife cannot. Here's the one I carry in my pack.
Best Survival Radios: Why You Must Secure One (before SHTF)
Be the ONE who knows what the hell is going on after SHTF. Here's how to set yourself up with a reliable survival radio in a future disaster.
Best EDC Flashlight: Simple, Small, Compact & Super Bright
The best edc flashlight is durable, bright, compact and worth carrying! In this guide, we review the best one to make your search easy.
11 Proven DIY Survival Gear Projects ANYONE Can Follow
Building DIY survival gear doesn't NEED to be complicated to be effective. Here are the 11 best projects you can finish in just a few hours.