 Today I’ve got something really exciting to share…
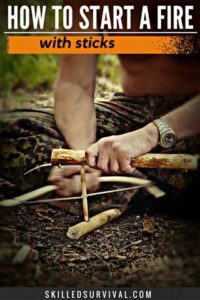
A Complete Guide On How To Start A Fire With Sticks
Because starting a fire with sticks is challenging…
But very doable with a proper set of instructions.
But without proper techniques, it’s nearly impossible.
Today I’ll show you the best ways find success, with pro tips and tricks.
TOPICS IN THIS GUIDE… ↓(click to jump)
- WHY You Should Learn This Skill
- It’s All About Generating Friction
- Preparation Is Crucial For Success

Why You Should Learn This Survival Skill
What’s the first survival skill you think of when you hear the phrase “Wilderness Survival”?
I bet water procurement and shelter building come to mind.
AND fire starting as well.
Why? Because fire is so useful in wilderness emergencies.
Warmth, signaling, cooking, protection from animals…and hope.
Fire and survival go together like bullets and guns.
There’s just a special place in the human heart for fire.
For instance:
When all hope seems lost in the wild, a fire will spark some inspiration to keep going.
It just feels like, “If you can make a fire…you can make it”.
Just whip out your $1.50 gas station Bic, hold flame to wood, and you’ve got yourself a warm campfire.
But let me ask you this;
- “Do you always have a lighter with you?
- Have you ever forgotten to pack one?
- Did it get confiscated by TSA airport security?”
The truth is:
Matches get wet, lighters run out of fluid.
And both are notorious for going missing when you most need them.
But sticks; yes sticks can be found anywhere.
Learning how to start a fire with wood is not a skill you want to be forced to use.
But it’s a skill every prepared survivalist should master.
Being able to start a fire, build a shelter, and craft survival weapons from raw materials is powerful.
The ability to survive with scavenged materials is called Bushcraft.
And Bushcraft is what wilderness survival is all about.
These skills are useful for:
- survivalists
- campers
- hikers
- backpackers
- hunters
- anglers
- or folks who enjoy a long weekend at a remote log cabin
It’s one of the self-reliance skills that might save your life.
↓ How to Start a Fire in a Survival Situation
Want a free 54 item survival gear checklist?
Enter your email below to instantly download this Complete Checklist PDF. No purchase necessary. 👇 👇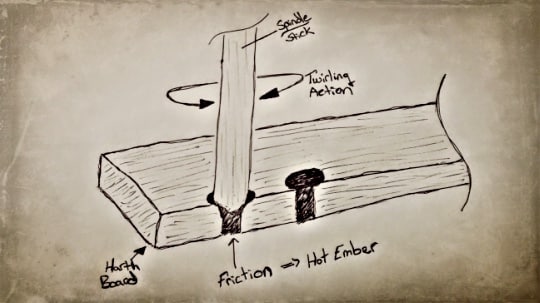
It’s ALL About Friction
Starting a fire with sticks, in its simplest form, boils down to harnessing the physics of friction.
Each of the three methods shares this concept.
So let’s go through how friction creates fire.
And then we’ll dive into the details.
Preparation Is Crucial
If you get the preparation right, you’ll increase your odds of success.
Preparation includes:
1. Procure the proper materials.
- Sourcing a dry straight stick (foot long & inch thick, & softwoods, such as pine or cedar, are the best type of wood)
- Finding dry flat wood to make a fireboard (or fire hearth)
- Creating a dry and very fine tinder bundle
- Creating (or gathering) pieces of kindling
- Having a small pile of dry larger sticks
The one thing in common on this list is dry wood.
If you start with damp wood, you’re at a significant disadvantage.
Don’t underestimate how important this is.
You get this wrong; you’re destined to fail.
Select sturdy wood with very low moisture.
Why? Because moisture is fire’s kryptonite.
The more moisture, the more friction will be necessary to overcome.
Seasoned woods are ideal.
But any thoroughly dried-out wood will do (a.k.a. dead wood).
2. Stage the materials.
You need to have your tinder bundle and kindling at the ready.
Much of this is fire starting 101.
The process of going from ember to fire is called “working a fire up the ladder.”
This is how it works:
- You begin with a heat source or flame. For this ember or flame to grow you need a very dry and fine tinder.
- Then this tinder bundle provides enough fire and energy to catch larger more robust materials such as kindling.
- Then finally, the fire is strong enough to catch small dry sticks and logs.
This is how you go from a small ignition source to a roaring fire.
If you skip these preparation steps you’ll find it much more difficult to get a fire going.
So before you begin, collect some dry kindling:
- old plants
- bits of cured wood
- dandelion fluff
- old stalks
- or dead grass
Any of these can act as your tinder bundle.
In general, the finer the tinder, the more flammable.
If your tinder bundle is not dry and fine enough, you’ll struggle to move up the fire ladder.
Also, gather larger twigs and sticks as kindling.
Kindling is wood (sticks) slightly larger and most substantial than tinder.
Flammable materials such as dry cedar bark, pine shavings, and needles, are all kindling options.
All those resinous dried softwoods burn fast.
You’ll add these slower-burning hardwoods to your fire immediately after you’ve got it going using your tinder bundle.
That’s it.
Here’s a quick recap:
-
- You find all the proper materials (dry stick, dry board, dry/fine tinder material, dry/fine kindling materials, and small/dry sticks)
- Prepare materials for ideal setup (fire drill set up and fire-starting materials setup)
- Create massive amounts of friction using one of the three techniques discussed below
- The friction buildup will turn the friction point into a hot ember (wood burn)
- Quickly transfer the hot ember into your tinder bundle and blow gently (this ignites your tinder bundle)
- Grab the kindling and use the burning tinder bundle to ignite it
- Keep adding larger, dry sticks to create a long-lasting fire
This is how you find success in lighting the fire starting with a tiny ember.
Want a free 54 item survival gear checklist?
Enter your email below to instantly download this Complete Checklist PDF. No purchase necessary. 👇 👇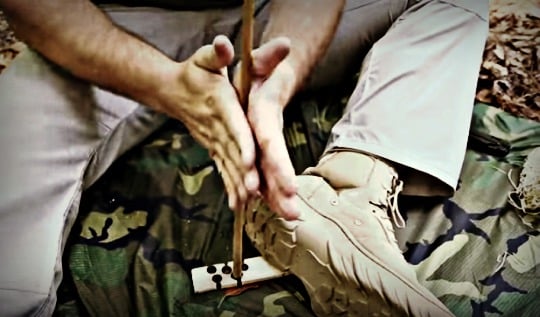
1. The Hand Drill Method
The simplest way to create enough friction is with a fire drill.
A fire drill looks exactly like it sounds.
It’s a drill made of sticks and wood.
The setup mirrors the design of a drill press.
It’s a combination of a long, straight, dry, sturdy stick with one end sharpened to a point and a flat piece of wood.
The stick’s sharp tip is set down at a perpendicular angle onto a flat piece of firewood called a fireboard.
But before drilling, choose the proper material selection: fireboard and sticks.
As we touched on early, the wood must be dry.
The drier, the better.
Once a fireboard and stick have been procured, it’s time to focus on creating an enormous amount of friction.
Now with this fire drill setup, place your open hands on either side of the stick.
Palms flat, stick between palms and you rub your hands together making the stick twirl.
The twirling action of the stick transfers rotational energy (via friction at the point of contact) between the stick and the fireboard.
Pro Tip:
Placing your left foot on the fireboard will hold it steady while you are twirling.
With a hand drill method, friction is created by twirling the pointed stick with your hands while at the same time adding downward pressure through the stick into the fireboard.
The combination of spinning and pressure, creates the friction buildup needed to create a hot ember.
Pro Tip:
Make sure you make a small notch in the fireboard for the tip of your fire drill stick to rest in. That shallow notch is where you’ll focus the friction to create a hot ember.
The notch also helps to ensure your drill stick doesn’t wobble all over the fireboard.
You’ll also need to add a side notch on the board.
The side notch allows oxygen to reach the ember.
Without a notch, the hot wood fibers have nowhere to build up.
And it will take much longer to create a hot ember.
Once set up, the process is simple (but not suggesting it’s easy).
Just give this setup enough friction (energy) to turn the contact point into a hot coal or ember.
And a hot ember is the Holy Grail of creating fire with sticks.
This sounds simple, right?
Well, it is, in theory, but here’s the catch.
While rubbing your hands together to twirl the stick, you also have to push down to create pressure.
Because without downward pressure, you won’t be able to create enough friction to turn the point of contact into a small hot ember.
Significant amounts of friction are created only by the combination of 1) fast rotation and 2) downward pressure.
So you’ll need to twirl a lot.
And then twirl, twirl, twirl, and twirl some more until the end of the fire drill rubbing against the fireboard produce a whisper of smoke.
When you see that whisper of smoke, you’re not done but you’re making progress.
You’ll need to dig deep and twirl with even more vigor.
If you pause to rest, even for a second or two, the friction you’ve worked so hard to build up will be lost.
So no breaks. If you want to succeed, you must keep twirling…
The goal is to twirl until the tip of the fire drill becomes hot enough to grow into a small, very hot ember.
Once you have an ember, you can stop twirling and transfer the coal from the fireboard to the tinder bundle.
You don’t need to rush here, a good ember will be useful for a couple of minutes but also don’t waste time.
Place the ember into the tinder bundle and blow gently on the ember to give it some oxygen.
Oxygen will stoke the ember and help it to transfer the ember’s energy into the tinder material.
If successful, the tinder bundle will begin smoking and will eventually burst aflame.
Then just work your way up the fire ladder from ember to fire.
Congratulations!
You have now successfully started a fire with sticks using the hand-drilling methodology.
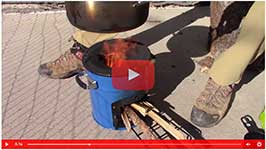
Now if a picture is worth a thousand words, then a good video is worth at least 100 times that.
So here is an excellent video that goes into the details of how to start a fire using the hand drill method:
↓ Hand Drill Friction Fire: Complete Step by Step
As simple as this method seems on paper, it’s not nearly as easy as it sounds.
To be honest, this is one of the most challenging ways to start a fire with sticks and requires a ton of determination.
Why? Because not only will the contact point become affected by the forces of friction, but so will your hands.
Your hands will quickly become hot and sore.
If your hands are not used to this sort of abuse, they will soon become blistered and bloody as well.
And that’s the rub (pun intended!)
Often the pain in your hands becomes too great to continue before you can establish a glowing ember.
It may become so painful that you will swear, curse, and give up in a heap of sweaty, frustrated agony.
So can a fire be started with a fire drill setup using only your hands?
Yes, it is possible, but unless your calloused hands are accustomed to this sort of abuse, it’s not probable.
However, all is not lost.
The way I see it, you have two options to help improve your odds of success:
- If you have another person with you, you can trade off twirling. For this to work, you have to transfer twirling duties quickly. Because every time you stop (even for a second or two) you lose hard-earned friction buildup. However, if you can transfer quickly, you will allow your hands and muscles a break. Which over time may allow for a faster, more successful friction buildup.
- Make a simple tool and setup modification to take your soft, weak, fleshy hands out of the equation altogether.
Want a free 54 item survival gear checklist?
Enter your email below to instantly download this Complete Checklist PDF. No purchase necessary. 👇 👇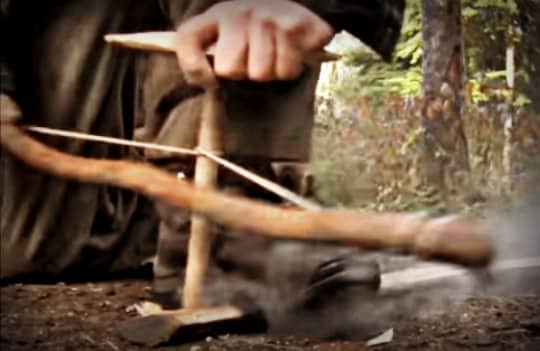
2. The Fire Bow Method
Another way to start a fire with sticks is with the use of a fire bow.
You may recognize these from movies of a certain time period where the heroes fashion a bow-designed device from a branch and some twine.
They give the fire bow a few smooth pulls, and moments later fire jumps to life.
Again, it’s not as easy as it looks.
The directors of those sorts of movies edit out the hours of toil and sweat and instead hop right to the best part – when the fire starts.
A fire bow is composed of a sturdy branch but, in this case, you want it to have some moisture.
This helps prevent it from snapping while you are drilling for friction.
The sort of branch you are looking for has a slight C shape to it, like a bow.
Yes, you can buy a fire bow and practice with it at home, but we are talking about ruggedly living off the land for a time.
Blue light specials won’t save you.
Try making a fire bow at home from natural materials so you know what to do in the event of wilderness survival.
So once you have your bow-shaped stick there are a few more steps to create a fire bow.
Next, you need some string or paracord.
Most string materials can work, twine, shoestring, etc.
However, I keep a paracord bracelet on me at all times because it’s the perfect material for this task.
Worst case, if you don’t have shoe strings or paracord, you can tear a long strip of sturdy material from your clothing.
Not ideal but you can make it work.
Another wilderness option is to find some tough, flexible vines, like grapevines.
The length of cordage you need is roughly one and a half times the length of your fire bow.
Now fasten the cordage to each end of the fire bow, at the tip ends.
Pro Tip:
A fire bow fire drill works better if you select a stick that is larger in circumference than the one you’d twirl in your hands.
This helps give the bow cordage more area to grab which helps smooth the twirling process.
Now since you’re not twirling with both hands and are instead using only one hand on the fire drill, you can use the other hand to apply a stabilizing bearing block.
This is a piece of wood (or shell) held comfortably in your hand and placed on top of the fire drill to keep it steady as you twirl.
If using wood as the stabilizing bearing block you’ll want to add a natural lubricant to it.
A lubricant helps to prevent the bearing block from building friction and working against your twirling efforts.
Some fresh leaves work for this or a crushed worm or slug can work as well.
As before, make sure you have a tinder nest with easily ignitable materials on hand, ready to catch fire.
Now you’re ready to drill for fire.
The fire drill cordage is looped once around the stick so you can twirl it by moving the bow in a back-and-forth motion like you are sawing.
The fire bow string twirls the fire drill, so its point rubs against the fireboard, creating fire-producing friction.
You hold the fire drill steady in place with your free hand placed on top of the hand-hold, keeping the fire drill from dancing all over the fireboard.
The fire bow has the following benefits of hand twirling alone:
- It’s way easier on your hands.
- You can create more downward pressure and maintain a similar twirling rate. This is due to the freehand pushing down on the stick through the stabilizing block.
- When one hand gets sore, you can switch hands, which should help maintain a fast twirling rate and pressure without tiring as quickly.
Everything else remains the same.
Friction–>hot ember–>tinder bundle–>kindling–>small sticks–>logs–>FIRE.
![]() Now do yourself a favor and pick up a bow drill kit that’s expertly designed and ready to go.
Now do yourself a favor and pick up a bow drill kit that’s expertly designed and ready to go.
A bow drill kit makes things much easier and more fun.
Here’s a video that shows this method in a way that is easy to follow:
↓ How To Start A Fire By Friction
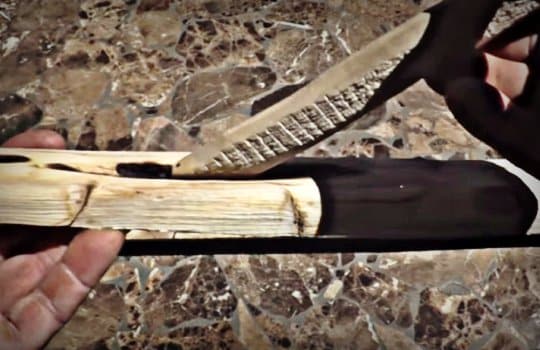
3. The Fire Plow Method
The third way to start a fire with sticks is by employing a fire plow setup.
A fire plow uses the same physics of friction but in a slightly different way.
With a plow, the necessary friction develops from sliding back-and-forth, instead of rotational.
So to accommodate sliding, you create a trough in your fireboard.
To create the trough, find a sharp rock.
This trough is where you place the tip of your foot long stick.
Then you push and pull the tip of the stick down into the fireboard at a 45-degree angle.
So the pressure slides the stick along the trough.
Doing this quickly, repeatedly, and forcefully, creates the friction build-up necessary to create a hot ember.
Everything else from preparation to “working up the fire ladder” is essentially the same.
Here’s a video on using Yucca to build a fire plow.
↓ Fire Making with the Fire Plow
Conclusion
The best way to learn is to practice.
I just supplied the first half of the equation, now it’s time for you to supply the second half.

![]() Get a good bow drill kit if you want a fire starter to help with initial success.
Get a good bow drill kit if you want a fire starter to help with initial success.
Then practice.
Rubbing two sticks together until you can create fire.
![]()
Happy Drilling & Plowing.

Prepare, Adapt & Overcome,

P.s. - I just found out 2 out of 3 Americans don’t feel prepared for a 3 day disaster!!!

I guess this goes to show how modern society continues to embrace ‘living a fragile life.’ What’s crazy is… it’s so easy to fix.
To make sure YOU have the basics, watch our FREE training on “10 Simple Steps To Basic Preparedness” that shows you HOW.
Nothing crazy here… this isn’t doomsday prepping... just the basics every responsible adult should have before a disaster strikes.Why You Can Trust Skilled Survival...
Go here now to review a full breakdown of:
- Who We Are
- Our Credentials
- Our Mission
- & Product Recommendations...
Here are a few highlights of our teams credentials & certifications:
- Certified Member of a Mountain Search & Rescue Organization
- Plant Emergency & Safety Leader for a Major Food Manufacturer
- Member of the 10TH Mountain Division Hut Association
- Certifications: Avalanche 1, WFR, CPR
- Official Gear Tester for Numerous Outdoor Gear Companies
- Countless Multiday Backpacking trips into Remote Wilderness
- Bachelor's Degree In Mechanical Engineering
- Bachelor's Degree In Civil Engineering
- Bachelor's Degree In Biomedical Engineering
"It takes 20 years to build a reputation and five minutes to ruin it." - Warren Buffett
We're fully aware that trust is NOT something you GET but is EARNED.
And we'll continue to earn YOUR trust through our forthright and honest approach with each new Blog Post, Guide & Product we create...
P.s - I just took this FREE 60-second 'Readiness Score Quiz'👇
AND... I've still got a few gaps in my preps...🤔 But at least, I'm not part of 'The Fragile Masses'. 👍 Find out where YOU stand by answering a few questions...
Recommended Reading
Survival Pack: How To Build One NOW (before SHTF)
A complete list of critical items that need to be in your survival pack before heading out into the wilderness.
Survival Packing List: Best For An Evacuation
Everyone needs a survival packing list to organize their escape. That way you won't regret leaving something critical behind.
Wild Edible Plants: The 13 Best Ones ANYONE Can Find
Discover the best wild edible plants you can find and eat nearly anywere. Knowing and identifying these wild edibles could save your life.
How To Make Catfish Bait: My Grandpa’s Ultimate Recipe
I want to share with you what I consider the best catfish bait recipe. Here's how to make stink bait that will get the catfish to bite.
Paracord Projects: 17 Useful Survival Tools You Can Make Today
I share the best paracord projects that are both fun and useful. By doing these crafts you'll always have lifesaving cordage on hand.
Survival Skills: The Ones Everyone Should Master
The best survival skills will keep you alive even in extreme conditions. 1. Water 2. Shelters 3. Fire 4. Navigation 5. Signaling 6. Medical