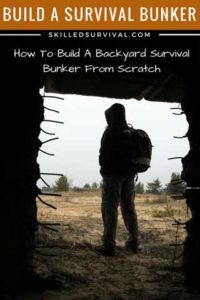
 A Guide To The Best DIY Bunker Options Available Today…
Because who doesn’t want their own underground bunker? With so many threats on the horizon, NOW is the best time to start thinking about building a bunker!
Today, I’ll show you the best DIY bunker options—from affordable to least.
I’ll also break down the pros and cons of each, so you can choose what fits your survival needs and your budget.
Want a free 78 item bug out bag checklist?
Enter your email below to instantly download this Complete Checklist PDF. No purchase necessary. 👇 👇There Are 5 Main Types Of Bunkers
1. Industrial
These were designed to protect industries essential to the German government during WWII. They were primarily used as mining sites, data storage centers, food storage areas, and occasionally used as living quarters.
2. Trench
This bunker is a smaller concrete structure that is partly dug into the ground as part of a trench system. They were crude, open-aired shelters to protect soldiers during Trench Warfare.
Staying hunkered down in the trench prevented soldiers from being sitting ducks for machine-gun fire from the enemy.
3. Munitions Storage
A munitions bunker held explosives and was typically built into the side of a hill. They were not designed for human occupancy.
4. Artillery
This was a secure place for weapons and ammunition. These types of bunkers were usually built on coastlines for large-scale wars.
5. Personal Survival Bunkers
Personal bunkers are often attached to homes or located on personal property. This helps to protect regular folks from bombing raids, nuclear fallout, or severe weather.
Today, those who want to live a resilient life use these bunkers to protect themselves from:
- Tornadoes / Hurricanes / Wildfires
- Major Food & Water Scarcity
- Foreign Occupations / Civil War
- Widespread Civil Unrest
- Nuclear Bombs / Fallout
- Deadly Viruses / Diseases
A DIY underground bunker is the ultimate bug-out location ON YOUR OWN PROPERTY! One where you can immediately shield yourself from ANY above-ground conflict.
Note: Here’s one of our previous articles on How To Build An Underground Survival Shelter from Scratch
Want a free 78 item preppers checklist?
Enter your email below to instantly download this Complete Checklist PDF. No purchase necessary. 👇 👇9 Homemade Bunkers To Expensive (Pros / Cons)
Let’s face it, preparing for a future catastrophe isn’t cheap. You must spend your hard-earned money on the right equipment and supplies. This investment is made to survive and thrive in various catastrophes.
That’s why we acquire guns and ammo, right? It’s why we spend money on Ham radios and building bug-out bags, get-home bags, and TFAKs. And the super-rich can afford a high-tech bunker.
Something that makes your BEST vacation look like a dump. But the rest of us need to build our own DIY bunkers on the cheap. You only need to ensure your DIY bunker is safe and secure. And that CAN BE AFFORDABLE!
Now, let’s investigate the different types of DIY bunkers you can construct. We will start with the cheap underground bunker and work our way up.
1. Inside Your House
Your house may already have the makings of a cheap DIY underground bunker. Some DIY bunker ideas for the home are:
- A crawl space under a home could be dug out and sealed
- And unused partition of a basement (safe or panic room)
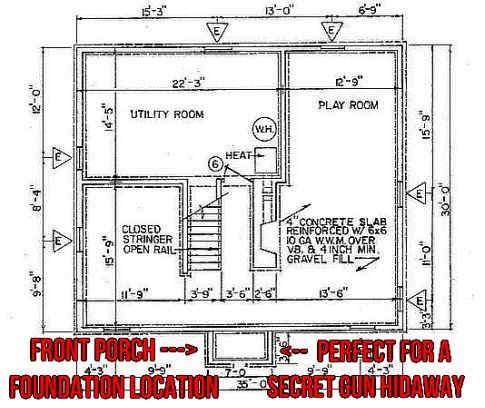 If building a new house, consider designing a homemade bunker within or underneath it. Many folks leave the area under a front porch as a hidden panic room.
This option is the most affordable of all the DIY Bunker options. But with THAT comes big tradeoffs:
Pros
- The rough structure is already built. You need to make it livable and secure.
- It’s right under the house so that you can make a quick getaway
- It’s well hidden with a house over it
Cons
- It may not have a finished concrete floor
- Someone could gain access by breaking through the wood floor above
- It doesn’t give you distance with a separate bunker away from the home
Here’s a video series from Lumnah Acres, where he builds a “root cellar” in his unfinished basement. This same general idea can also be used for a “basement survival bunker:
↓ Building Our Root Cellar

2. Backyard Root Cellar
 A small backyard root cellar is one of the most affordable DIY Bunker options. And it’s not attached to your house but still very close by.
Plus, it’s underground – so it naturally stays warmer in the winter and cooler in the summer.
It can also act as a fallout shelter. A
Pros
- Small footprint
- Underground and on your property
- Affordable (especially vs. other DIY bunker options)
Cons
- Limited space, so it might feel very cramped after a few days
- Not as hidden as true “underground bunkers.”
Here’s a video that goes over why a small
↓ Backyard EZ Cellar Bunker

3. Natural Cave or Burrow
If you own some land, perhaps you have a property with a natural void in the ground. This has the potential to be turned into a cheap bunker.
It may be an abandoned mine or an old den for wild animals, but you can put it to good use, whatever the case. When going into a cave, you need to be cautious.
You don’t know what’s inside and how stable the roof and walls are. You’ll need structural support, but this is true of all bunkers. You can even dig your own cave if your land is suitable.
Pros
- The basic structure is already made
- It usually has only one entrance to fortify
- It’s easy to camouflage
Cons
- You need to stabilize the walls and roof
- Water leaking in could be an issue
- Once a secure door is attached, you must tunnel out for ventilation.
Here’s a video of a “makeshift” bunker built into a cave/burrow on public land:
↓ Wisconsin Fugitive Survives 3 Years In Makeshift Bunker
4. Buried Culvert
Now, we’re moving to more complicated DIY Underground Bunker builds. If this is the direction you’re going to go, I recommend you invest in some solid bunker plans.
Here’s a product that provides excellent bunker plans: Family Bunker Plans.
The culvert DIY bunker option uses a large steel culvert buried as your escape pod. These heavy-duty pipes are engineered with a corrugation profile. This design helps to maintain structural integrity and is then buried in the ground.
Culverts can stand the force of the earth on top of it, so you can easily bury them to your required depth.
Like with all your DIY bunker ideas, you must build out the living and storage areas inside. You will also need to weld both ends and fashion a proper exit going up to the surface.
Pros
- It’s a very strong structure that can be buried without stabilizing
- They come in various sizes and lengths
- They are affordable
Cons
- You only get a long rounded tube to work with for the build-out
- It has two wide openings that will need to be closed in
- Height and width could be an issue
- It may be impossible depending on local water table
↓ 10 X 20 Round Culvert – The Backyard Bunker
5. Buried Shipping Container
Finding a shipping container to convert to a cheap DIY underground bunker is easy. Used ones are rotated out of service constantly. Several companies sell new and used ones for home use.
Often, folks add them to their property to secure tools and equipment storage. But they can also have a greater purpose.
A shipping container already has the structure built and is made of steel. The doors are already steel, too, making them very secure. You will have to reinforce the sides and roof when burying it. That way, it won’t cave in, and then you can build the interior how you like.
Pros
- The structure is already built
- Just dig a hole and drop it in
- You can easily connect multiple containers together
Cons
- Used containers may have toxic spills inside
- Metal walls and roofs aren’t strong enough to be buried without reinforcing them
- You aren’t building the outside structure, so it’ll cost more for the container
↓ Shipping Container As An Underground Bomb Shelter
6. Above Ground Concrete Blocks
This is a cheap DIY underground bunker you can build piece by piece. The excavation won’t be as deep, so you can hand-dig it yourself if you don’t have access to a machine.
This homemade bunker requires a solid, concrete footing. With a solid foundation, you can pour yourself with a bit of lumber and concrete. Then, you build up bricks or cinderblocks layer by layer.
When the walls are complete, build a form inside for the roof with lots of rebars and pour the concrete on top.
You may want to add some rubber peel and stick it to the outside before you backfill. That way, you avoid any issues with water seepage. And then it is half in and half out of the ground, ready for you to camouflage.
Pros
- A great DIY project that you can build, block by block
- Excavation is easy because it is only halfway to the ground
- It can be built in a week
Cons
- Laying block is hard work, and you will need a scaffold to reach the top
- Lots of mortar and concrete mixing by hand or barrel mixer if you have one.
- You need to make sure the above-ground part of the structure is well-hidden
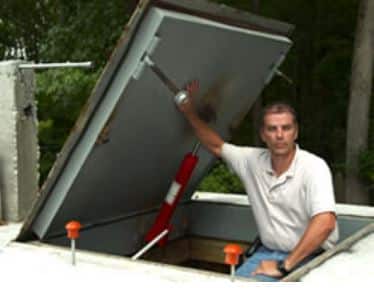
7. Prefab Bunker
This bunker has already been cast and is made of concrete with structural rebar in it. Several companies sell different sizes of bunkers. This is still a DIY bunker because you need to dig the hole and pour a concrete base.
Once the bunker is in place, you’ll need the exterior backfilled and interior buildout. You’ll also have to put in a strong steel door.
Pros
- You save time by not having to build the structure
- It’s built solid with thick, reinforced concrete
- This gets you into a bunker quick
- You can go any size you want if you have the room and money
Cons
- Because you aren’t building the structure, the cost is more expensive
- You need a strong base to place the bunker on
↓ Texan Maker’s Underground Survival Bunkers Are Real Batcaves
8. Hillside Bunker
A hill bunker takes advantage of a sloping property. This DIY underground bunker will take extra planning and know-how. Why? Because it can be dangerous to excavate.
As you start digging into your hill, you must shore up the roof so it doesn’t cave in.
Pressure-treated wood or steel works well. But ensure it is secure before going inside. Once dug and made safe, you have a great bunker that can only be penetrated from the front.
You should add a concrete entrance with a steel door so no one who is not invited can get in.
Pros
- The outer structure is a natural hill
- No one can get in except through the main door
- You use a natural background for your DIY bunker, easily blending in with the landscape
Cons
- You need an excavator and an operator who knows what they are doing
- This requires support from timber, steel, shotcrete walls, pillars, or a combination
- It’s usually not completely hidden from view
- Ventilation is crucial, especially the further you go
↓ Underground House In The Hill
9. Luxury Bunker
Most bunkers we have covered so far are ones some of us can afford without too much cost. But if you have money to burn, why not build an underground bunker with some luxuries? DIY Bunker doesn’t have to mean cheap.
You can go online and find plans to construct your own multi-room bunker. And then buy your materials and get building.
Outside, the structure must still be solid to be buried and out of sight. Inside is where your luxury starts.
You can make it look like a high-end home with full bedrooms and a state-of-the-art kitchen. You can even put it in a movie theatre and games room. There will be extensive ventilation, heating, and electrical requirements and challenges dealing with water and waste.
There is no limit, so go as far as your money will take you.
Pros
- You can have all the bells and whistles
- There will be enough room not to go stir-crazy
- You can bring lots of friends and family
- It will feel like a fallout vacation
Cons
- It’s going to take a lot of money to have a luxurious DIY bunker
- It will take more time than any other cheap DIY underground bunker project
↓ A Complete Luxury Doomsday Bunker
10. Communal Bunkers
For a bunker on steroids, build an underground shelter community. A group with multiple bunkers attached and private residences with common areas. It takes a shared vision, a willingness to compromise, and a community spirit.
Companies already do this, but buying in takes a large investment.
↓ The World’s Largest Doomsday Community
Want a free 78 item preppers checklist?
Enter your email below to instantly download this Complete Checklist PDF. No purchase necessary. 👇 👇DIY Bunker Basics & Key Supplies
Whether you go cheap or luxurious, there are must-have items to stock:
Electrical & Lighting
You need to bring in power from the grid or use off-grid solutions. Power is necessary for illuminating your DIY underground bunker at a minimum. And if you want to power a water pump or a ventilation fan, you’ll also need power.
In small applications, you may get by with a power station and some solar panels – like I use when camping.
Air Filtration System
Everyone needs fresh air to survive. So, consider how you are going to access above-ground ventilation.
You’ll need an outlet vent with a small fan sucking the stale air out of the bunker. And an inlet vent with a filter will allow fresh air in from outside.
Make sure the filter is good enough for nuclear war. And stockpile several, and make changing them easy.
Food & Water Storage
DIY bunker projects are small, so don’t forget you need lots of room for food and water.
Canned meats and freeze-dried foods are great, as well as home-preserved food.
Ensure plenty of water to drink, wash, and bathe. I recommend a minimum of 2 weeks of food and 2 weeks of water.
If you can do more, great, but now you have a target amount to shoot for if you’re just starting.
- For water, I assume 1 gallon per person per day.
- For food, use the “Daily Calorie Requirement Estimates.”

Medical Supplies
If you are heading to your bunker, you may already be injured and need medical supplies to treat wounds. Accidents while underground can happen, too.
Have a robust IFAK kit (individual first aid kit) with lots of extra trauma supplies on hand. My go-to medical kit vendor is MY MEDIC.
They have high-quality kits for all skill levels and needs, from IFAKs (individual first aid kids) to ITAKs (trauma first aid kits) and everything in between.
Gas Masks and Filters
Let’s be real; one of the major reasons you’re thinking about building a bunker is to survive a nuclear blast and fallout. What happens if you’re forced to go outside for supplies or in an emergency while it’s still dangerous?
That’s why everyone should own at least 1 gas mask and several filters.
My go-to gas mask vendor is MIRA SAFETY. If you don’t have any gas masks, get some on order right now.
If you wait, you won’t get one later; they sell out almost immediately at the start of a crisis (like in the spring of 2020 and the start of the Russian invasion of Ukraine).
Currency
You may not need any money while underground. But once you exit your DIY bunker for supplies or to reemerge into society, you need a way to buy things.
Cash is usually great, but if things go south, you should have gold or silver as a reliable backup. That’s why I’m acquiring Silver Rounds through SD Bullion every month…
Entertainment
You can go stir-crazy, so consider what you want to do in your DIY bunker. TV and radio are great to keep up with the catastrophe above, but they require electrical power…
Same for music, unless you make your own music via an acoustic guitar, harmonica, etc.
Make sure to have games for the kids and stock lots of physical books. Board games, card games, and puzzles are fun, too.

![]() Side Note: One of my all-time favorite strategy games is Forbidden Island.
Side Note: One of my all-time favorite strategy games is Forbidden Island.
I can play it for hours and never get bored.
↓ 10 Prepper Supplies EVERYONE Is Overlooking
What Is A Bunker
“Bunker” comes from the Scottish word for “bench, seat.” This is odd because that is NOT what I think when I hear “bunker.” However, it was also used as the shortened form “bunk,” which was used to describe a “sleeping birth.”
The Old Swedish term “bunke” meant “boards used to protect a ship’s cargo.” So, if you combine these original ideas of a “protected sleeping quarter,” you can see how this term evolved into the modern idea of a “survival bunker.”
To be clear, a bunker IS NOT a “She-Shed” or a “Man-Cave.” It’s NOT a backyard hut where ladies have lunch or “the guys” watch the big game while eating finger sandwiches or chicken wings.
A bunker is a personal self-defensive fortification. One that should be well-built to withstand entry from anyone who intends you harm. Most are often located underground to:
- Remain hidden (i.e., you can’t attack what you don’t know is there)
- Avoid above-ground dangers (bombing, nuclear fallout, infections, other humans, etc.)
The bottom line: The primary goal of a homemade bunker is to protect the ones you love. And to survive in a safe (often underground) location.
Final Thoughts
Having a DIY bunker is an essential survivalist item you hope you never need. But those with one can weather whatever shitstorm comes their way!

Prepare, Adapt & Overcome,

P.s. - I just found out 2 out of 3 Americans don’t feel prepared for a 3 day disaster!!!

I guess this goes to show how modern society continues to embrace ‘living a fragile life.’ What’s crazy is… it’s so easy to fix.
To make sure YOU have the basics, watch our FREE training on “10 Simple Steps To Basic Preparedness” that shows you HOW.
Nothing crazy here… this isn’t doomsday prepping... just the basics every responsible adult should have before a disaster strikes.Why You Can Trust Skilled Survival...
Go here now to review a full breakdown of:
- Who We Are
- Our Credentials
- Our Mission
- & Product Recommendations...
Here are a few highlights of our teams credentials & certifications:
- Certified Member of a Mountain Search & Rescue Organization
- Plant Emergency & Safety Leader for a Major Food Manufacturer
- Member of the 10TH Mountain Division Hut Association
- Certifications: Avalanche 1, WFR, CPR
- Official Gear Tester for Numerous Outdoor Gear Companies
- Countless Multiday Backpacking trips into Remote Wilderness
- Bachelor's Degree In Mechanical Engineering
- Bachelor's Degree In Civil Engineering
- Bachelor's Degree In Biomedical Engineering
"It takes 20 years to build a reputation and five minutes to ruin it." - Warren Buffett
We're fully aware that trust is NOT something you GET but is EARNED.
And we'll continue to earn YOUR trust through our forthright and honest approach with each new Blog Post, Guide & Product we create...
P.s - I just took this FREE 60-second 'Readiness Score Quiz'👇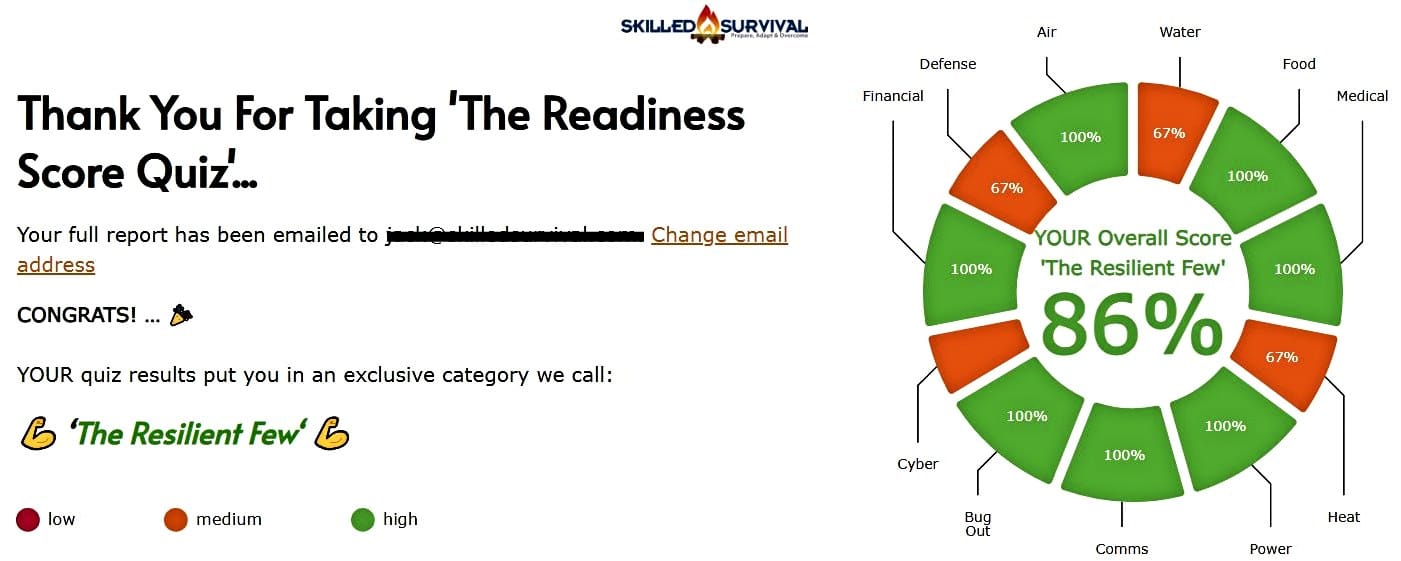
AND... I've still got a few gaps in my preps...🤔 But at least, I'm not part of 'The Fragile Masses'. 👍 Find out where YOU stand by answering a few questions...
Recommended Reading
Prepper Gear: 10 Must-Own For Basic Preparedness
Here are the must-own pieces of prepper gear EVERY home should own before the next major crisis, with specific gear recommendations.
Prepping Quotes: 23 Of The Most Famous Ones
Prepping is based on wisdom going back centuries. Here are the best 23 famous prepping quotes I've found that prove getting prepared is smart.
10 Unique Prepper Supplies That Will Vanish After Panic
If you're serious about prepping, start working through this list of 10 OVERLOOKED prepper supplies. It'll make you much more resilient.
How Will The World End: The Biggest Threats To America
Today I'm going to answer the question; how will the world end - covering the biggest threats to humanity as we know it.