Today I’ve got something really important to share…
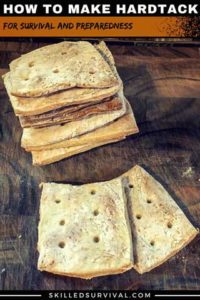
A Complete Step-by-Step Guide On How To A Make Hardtack
- Maybe you’re trying to figure out what hardtack even is…
- Or maybe you’re looking for the best step-by-step recipe.
Either way, you’re in the right place.
This amazing survival bread is easy to make and lasts a long time…
TOPICS IN THIS GUIDE… ↓(click to jump)
- What Is Hardtack: A Brief History
- Reasons Why Hardtack Is Amazing
- Best Hardtack Recipe (ingredient list)
- How To Make Hardtack At Home
- Pemmican: Hardtack In Meat Form
- Bonus: ANZAC Biscuits Recipe
- How To Make ANZAC Biscuits

What Is Hardtack? A Brief History
I’ve got to hand it to the ancient crews on old sailing ships.
They prove “necessity is the mother of invention.”
For thousands of years it took months to cross the high seas.
And yet, nearly every corner of the world was explored and mapped by the end of the “Golden Age of Sailing.”
These sailors endured long voyages that took months without a harbor.
Sometimes it was years before returning to port.
These trips required food stores that last.
Remember:
This is before refrigeration, canned food or canned bread!
So one of the staples was a simple, dense, hard survival bread called Hardtack.
A survival biscuit made with three simple ingredients:
- white flour
- water
- and salt
Hardtack is a solid survival bread that holds up well to rough transport,
And “keeps” nearly indefinitely.
It’s acquired many “interesting” nicknames over the years, such as:
Ship’s biscuit, sea biscuit, cabin bread, sea bread, dog biscuits, molar breakers, and even worm castles.
Why?
Civil war soldiers discovered worms and weevil infestation was a regular problem…yuck!
But since it was both inexpensive and nearly indestructible, this hard biscuit often made up most of a sailor’s rations.
In fact, in 1588, the British Royal Navy provided each sailor 1 lb. of hardtack biscuits.
And a gallon of beer PER DAY!
Obviously, this biscuit was a shipboard staple.
Entire industries sprang up to support the resupply of ships with this stuff.
Now, if flour, water, and salt sounds bland, you’re in good company.
When a ship’s cook wasn’t within earshot, sailors often called it “molar breakers,” or “sheet iron.”
Traditionally eating hardtack is HARD.
Why? Because you bake it, leave it out to dry, and store it with desiccants.
Each step removes moisture.
Making it hard, and difficult to chew.
You may want to soften it before consuming.
Fortunately, there are many methods to soften, including:
- soaking them in coffee
- drowning them in beer
- frying them with oil to make a hardtack pancake
- pounding them into crumbs and stirring them into soup

Many people choose to eat them like toast.
Then adding syrup or jam, to provide a sweet snack.
Many of the commercial recipes use additional ingredients (such as brown sugar).
This is an attempt to improve the texture and taste.
But these additions reduced the shelf life.
Common commercial additions are sugar, honey, spices, powdered milk or eggs.
However, these hard tack recipes are best kept refrigerated.
Why? Because the additional ingredients compromise the shelf life.
Especially oil and butter, which go rancid quickly unrefrigerated.
So if your goal is to make hardtack that last for years, stick to the basic ingredients.
↓ Hardtack – The Staple Of Armies On The Move
5 Reasons Why Hardtack Is Amazing
1. Ridiculously Long Shelf Life
Hardtack is a survivor.
It’s the superhero of survival foods.
You won’t find many other foods that can withstand the test of time.
So when the going gets tough, you’ll have a trusty, nutrient-rich companion by your side.
2. Portability at Its Finest
When you’re on the move carrying food is out of the question.
That’s where hardtack shines!
These bad boys are compact, lightweight, and won’t weigh you down.
Toss ’em in your:
- bug-out bag
- hiking backpack
- or stash ’em in your vehicle
That way, you’ll have a go-to energy source wherever you roam.
3. Simple Ingredients, No Fancy Prep
Survival is no time for gourmet cooking.
Hardtack is made from basic ingredients!
Mix it, bake it, and you’re done.
Anyone can whip up a batch of hardtack.
4. Endless Versatility
Hardtack is a blank canvas for your taste buds.
You can eat it as is, dunk it in your favorite beverage, or turn it into a hearty stew.
When you’re limited on cooking equipment, hardtack is your versatile sidekick.
It’s a reliable and ready complement to any meal.
5. Energy-Packed and Nutrient-Dense
When survival becomes your top priority, you need fuel to keep going.
Hardtack is a powerhouse of sustenance.
It’s packed with energy from carbohydrates, with a touch of salt for essential minerals.
In dire times, it’s crucial to eat fuels to keep you going.
Best Hardtack Recipe (ingredient list)
You can make hardtack with any flour:
- Whole wheat flour? Absolutely.
- Gluten-free? Yes, you can.
- Rye flour? A great alternative for those with wheat allergies.
With an afternoon of work (baking), you can add lots of hardtack in your pantry.
↓ How to Make Hardtack (Forever Lasting Bread)
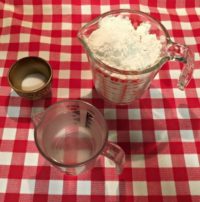 Start by gathering these ingredients:
- 2.5 cups white flour (+ a little extra)
- 1 cup of water
- 1 teaspoon salt
You’ll also need a few utensils:
- large mixing bowl
- rolling pin (or improvise!)
- cookie sheet
NOTE: There’s no yeast in the recipe.
So hard tack is an unleavened bread.
How To Make Hardtack Biscuits From Scratch
Note: If you prefer to watch a video, skip to the end.
Mixing The Ingredients
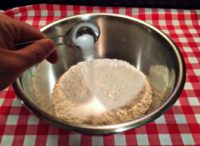 Start by mixing the flour and salt in a bowl.
Pro Tip:
Remove any rings on your fingers.
Hardtack dough is very sticky.
After mixing your dry ingredients well, add the water in small amounts.
- You can mix and knead the dough by hand
- Or with the bread hook attachment on a stand mixer
Again, it’s sticky at first but it quickly become a uniform dough.
If it’s still sticky after several minutes of kneading, add a small amount of flour.
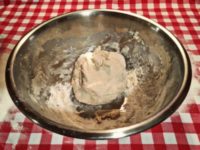 Once your dough forms a solid ball, dust a work surface with flour.
Then place the dough on the surface.
Note: Now’s the time to preheat oven to 375 degrees.
Rolling The Dough
Using a rolling pin, heavy pint glass, wine bottle, or even your hands, roll the dough.
Roll it out to roughly 1/4″-1/2” thick.
Cut the dough into serving-size portions.
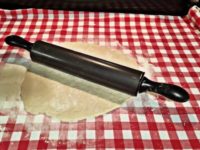 Form the dough into a rough square (rather than a pizza circle).
If you’re not experienced in using a rolling pin, use pencils as guides!
Lay a pencil on either side of the dough and press down until the rolling pin rests on the pencils.
This will give you a flat piece of dough.
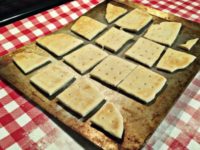
Cutting The Dough
 Place it on a cookie sheet.
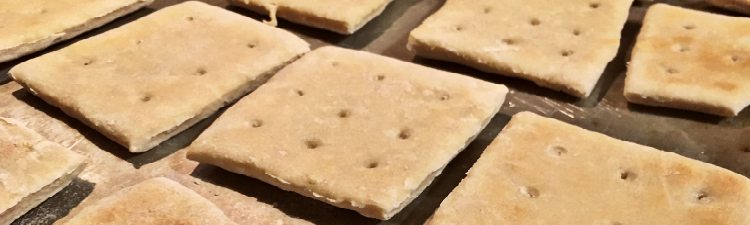
Use a knife to cut it into manageable “cracker” size pieces.
Roughly the size of a saltine cracker.
This cracker size is best for long-term storage.
And makes a good serving size for later.
A size that still fits in a mug if you plan to soak it with soup or coffee!
Poke The Crackers
Now, with your “sheet of crackers”, poke holes evenly across each piece.
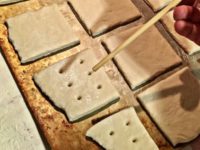 These holes help the biscuits bake consistently.
The holes allow more moisture to escape.
And keep the dough from rising in the oven.
Also, the holes make it easier to break the tough biscuits into smaller chunks later.
Bake The Crackers
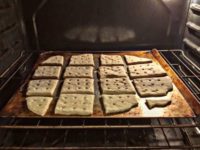 Now, bake the dough for 25-35 minutes in a 375 degree oven.
Or until it just begins to brown.
You’re looking for a light tan, more than a brown.
It’s very easy to scorch the flour, so pay attention!
When you have a light tan color, take the survival biscuits out of the oven.
And allow them to cool COMPLETELY.
You want it to be 100% cool before packaging.
 Trace of excess moisture will cause your hardtack biscuits to spoil prematurely.
So if you live in a dry climate, leave it out for several days to dry even more before storing.
Storing Your Hardtack Crackers
You can store dry hardtack for months (or even years).
Vacuum seal with Mylar bags and desiccants.
This removes moisture during storage.
And a solid container keeps rodents out.
Keep the individual packages small.
That way, you only open what you need while keeping the rest safe and dry.
Here’s how easy it is to make survival biscuits at home:
↓ How to Make Hardtack (The Bread that Lasts Forever)
As you can see, making hardtack is easy.
You can even make a fun day out of it by including your kids (or grandkids).
And when you’re done, you’ll get the amazing feeling…
Knowing you have nutritious bread to feed your family no matter WHAT.

Want a free family-first food planning guide?
Enter your email below to instantly download this Complete Guide PDF. No purchase necessary. 👇 👇
Pemmican – The Hardtack Meat Alternative
You cannot survive on bread alone (long term).
Your body needs other nutrients such as protein and vitamins.
But when it comes to long-term food storage, not any old protein will do.
Protein spoils rapidly without refrigeration.
That’s why you should make and store pemmican.
Pemmican is like hardtack in protein form!
Now, I won’t go into the history and details of Pemmican here.
Why? Because we’ve already written a detailed Pemmican article.
But if you’re interested in seeing how pemmican is made, check out the following video:
↓ How To Make Pemmican: Step By Step Guide
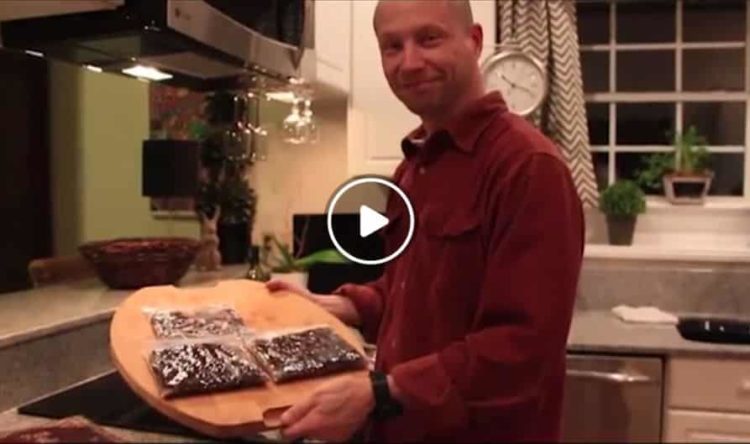
Pemmican is another survival superfood that pairs well with hardtack for survival.
Bonus: Anzac Biscuits Recipe
While in survival mode, a coffee-soaked hardtack meal will fill an empty stomach.
But no meal is complete without dessert!
ANZAC is another “survival biscuit” with a long shelf-life.
It was developed by the Australian and New Zealand Army Corps (ANZAC) during World War II.
The families back home wanted to send treats to the troops.
But it had to survive months of travel from the South Pacific to Italy.
This led to the creation of the “ANZAC Biscuit.”
Since then, it’s become a national staple in both countries.
Sure, ANZAC biscuits don’t have as long a shelf-life as hardtack (they contain sugar and butter).
However, they’re a wise short-term addition to any survival cache.
↓ ANZAC Biscuits Recipe
How To Make Anzac Biscuits
ANZAC Biscuit Ingredients:
- 1 cup each of rolled oats, sugar, and coconut
- 1 tablespoon golden corn syrup
- 3/4 cup flour
- 2 tablespoons butter
- 1 teaspoon baking soda (dissolved in 2 tablespoons boiling water)
ANZAC Biscuit Instructions
- Melt butter.
- Add corn syrup to dissolved soda and water.
- Combine with melted butter.
- Mix dry ingredients and stir in the liquid.
- Place small balls on a lightly greased cookie sheet.
- Bake for 20 minutes at 300deg (or until golden brown).
Dispelling The 5 Most Common Hardtack Myths…
1. The Indestructible Bread Myth
You might think hardtack is indestructible, right? Wrong.
While it’s true that hardtack can last for years, even this survival staple has its limits.
Don’t kid yourself into thinking it’s immune to mold or pests.
Like any food, it needs proper storage, or it’s just another piece of useless junk in your survival kit.
2. The Nutrition Powerhouse Myth
Let’s get real.
Hardtack isn’t your one-stop shop for nutrition.
Sure, it’s a great source of carbs, but that’s about it.
If you’re planning to survive on hardtack alone, you’re setting yourself up for a nutritional disaster.
Diversify your food sources; hardtack is a survival food, not a miracle worker.
3. The Easy-to-Eat Myth
Think hardtack is a quick and easy snack? Think again.
This stuff is tough, literally.
You’re not just biting into a biscuit; you’re gnawing on a survival tool.
Be prepared to soak it, cook it, or find other ways to make it edible.
Eating hardtack is a survival skill in itself.
4. The Tasteless Brick Myth
Many believe hardtack is just a tasteless brick.
But that’s not giving it enough credit.
Sure, it’s not gourmet, but with a bit of creativity, it can be a decent meal.
Add it to soups, stews, or even coffee.
Survival isn’t just about enduring; it’s about making the best of what you have.
5. The Unlimited Shelf Life Myth
Finally, don’t be fooled into thinking hardtack lasts forever.
Yes, it’s long-lasting, but it won’t outlive you.
Store it properly, keep it dry, and check it regularly.
In the world of survival, complacency can be your worst enemy.
Final Thoughts
So there you go.
Now you know how to make and store a life-saving survival bread.
Pair your hardtack with some pemmican, ANZAC biscuits, and bulk rice storage.
Now you’ve got yourself a legitimate DIY food stockpile.
You can have a ton of long-term calories on a prepper-friendly budget.
Now it’s just a matter of taking the knowledge and applying it.
Because taking action now, long before you need it, is the real secret to survival.

Prepare, Adapt & Overcome,

P.s. - I just found out 2 out of 3 Americans don’t feel prepared for a 3 day disaster!!!

I guess this goes to show how modern society continues to embrace ‘living a fragile life.’ What’s crazy is… it’s so easy to fix.
To make sure YOU have the basics, watch our FREE training on “10 Simple Steps To Basic Preparedness” that shows you HOW.
Nothing crazy here… this isn’t doomsday prepping... just the basics every responsible adult should have before a disaster strikes.Why You Can Trust Skilled Survival...
Go here now to review a full breakdown of:
- Who We Are
- Our Credentials
- Our Mission
- & Product Recommendations...
Here are a few highlights of our teams credentials & certifications:
- Certified Member of a Mountain Search & Rescue Organization
- Plant Emergency & Safety Leader for a Major Food Manufacturer
- Member of the 10TH Mountain Division Hut Association
- Certifications: Avalanche 1, WFR, CPR
- Official Gear Tester for Numerous Outdoor Gear Companies
- Countless Multiday Backpacking trips into Remote Wilderness
- Bachelor's Degree In Mechanical Engineering
- Bachelor's Degree In Civil Engineering
- Bachelor's Degree In Biomedical Engineering
"It takes 20 years to build a reputation and five minutes to ruin it." - Warren Buffett
We're fully aware that trust is NOT something you GET but is EARNED.
And we'll continue to earn YOUR trust through our forthright and honest approach with each new Blog Post, Guide & Product we create...
P.s - I just took this FREE 60-second 'Readiness Score Quiz'👇
AND... I've still got a few gaps in my preps...🤔 But at least, I'm not part of 'The Fragile Masses'. 👍 Find out where YOU stand by answering a few questions...

Recommended Reading
Long Term Fuel Storage For Survival Emergencies
Long term fuel storage is crucial in emergencies, but fuels must be stored properly especially long term gasoline storage.
How To Store Seeds For Wise Prepping & Survival
When seed saving and seed storage, you must do it right. Learn how to store seeds so they'll thrive the next planting season.
Common Everyday Carry Mistakes YOU Must Avoid At All Costs
The only person qualified to build YOUR Best Everyday Carry (EDC) is YOU. To do it right, you must avoid these common mistakes and pitfalls.
Strategic Relocation: How To Find A Safe Pace To Live
Use strategic relocation to find a safe, defendable location to call home. Your choice of location WILL determine your survival fate.
Nuclear Fallout Map: Would I Survive A Nuclear Bomb?
Have you seen this nuclear fallout map? Or run a nuclear simulation to see the damage a nuke would do to your city? If not, check this out.
Homestead Survival: How To Master Plan Your Safe Haven
Use this simple 6 homestead survival plan to successfully survive (and thrive) even if the world falls into chaos...